

Poor water circulation can turn a healthy dam into a stagnant water body with low dissolved oxygen, unpleasant odours, excessive organic matter and recurring algae problems.
Installing an aeration system can improve water movement and oxygen distribution, but the system must suit the dam. A small ornamental dam, a deep irrigation dam and an intensively stocked aquaculture pond have very different aeration requirements.
The correct installation method depends on:
- The dam’s surface area, depth and volume
- The shape of the dam
- Existing dissolved oxygen levels
- The purpose of the water
- Available electricity or solar access
- The number and type of fish present
- Sediment and nutrient conditions
- The amount of water circulation required
This guide explains the main types of dam aeration systems used in Australia, how each system is installed, the likely costs and the factors to check before work begins.
What Is a Dam Aeration System?

A dam aeration system adds oxygen to the water or creates water movement that supports gas exchange at the surface.
Aeration may help:
- Increase dissolved oxygen in the water
- Circulate water between different depths
- Reduce thermal stratification
- Improve conditions for fish and other aquatic organisms
- Reduce stagnant areas
- Support the breakdown of organic matter
- Reduce some odour problems
- Improve water quality for irrigation or livestock use
- Limit the conditions that allow some algae to dominate
Aeration is not a guaranteed cure for every water-quality problem. Blue-green algae, poor clarity and odour may also be connected to nutrient runoff, excessive sediment, livestock access, fertiliser use, decaying vegetation or poor catchment management.
The best results usually come from treating the source of the problem as well as improving oxygen and circulation.
Start with a Dam Assessment
Do not select an aerator based only on the dam’s surface area.

Two dams covering the same area may need different systems because one is shallow and circular while the other is deep, narrow and divided into several sections.
Before choosing equipment, collect the following information.
Dam surface area
Measure the approximate length and width of the waterbody. For irregularly shaped dams, divide the surface into smaller sections and calculate each section separately.
Surface area is generally recorded in square metres or hectares.
Average and maximum depth
Depth affects water volume, compressor pressure and diffuser placement.
A diffused aeration system installed in a deep dam needs enough pressure to push air down the airline and through the diffuser. A shallow dam may receive better results from a surface aerator or circulator.
Dam volume
Irregular banks, shelves and steep drop-offs will affect the actual volume. A bathymetric survey may be worthwhile for large, deep or commercially important dams.
You can use our Pond Volume calculator to calculate the Dam volume as well.

Dam shape
Long, narrow and irregular dams may require several aeration stations.
One aerator placed at a central point may leave isolated corners with little circulation. A multi-diffuser system can often distribute air across separate zones more effectively.
Water-quality conditions
Test dissolved oxygen at several depths rather than relying on a single surface reading.
Useful measurements include:
- Dissolved oxygen
- Water temperature
- pH
- Turbidity
- Ammonia
- Phosphorus
- Nitrogen
- Algae or cyanobacteria presence
Readings taken early in the morning can be particularly useful because dissolved oxygen may be lower before photosynthesis resumes during daylight.
Purpose of the dam
The intended use affects the required level of aeration.
Common applications include:
- Farm irrigation
- Livestock water
- Aquaculture
- Golf-course irrigation
- Residential landscaping
- Stormwater storage
- Firefighting water
- Public lakes
- Wildlife habitat
A lightly stocked farm dam may need circulation and basic oxygen support. An aquaculture dam with high fish density may need continuous aeration and backup equipment.
Types of Aeration Systems for Australian Dams
There is no single aeration method that suits every dam. The main options are diffused aeration, surface aeration, aerating fountains, venturi aeration and paddlewheel aeration.
Solar power can be used with several of these systems when mains electricity is unavailable.
1. Subsurface Aeration (Bottom Diffused Aeration)

A diffused aeration system uses a compressor installed beside the dam to send air through a weighted airline to one or more diffusers positioned on the dam floor.
The diffusers release bubbles into the water. As the bubbles rise, they pull water upwards and create circulation through the water column.
A typical system includes:
- An air compressor
- A ventilated weatherproof enclosure
- An air manifold
- Weighted airline
- One or more diffuser stations
- Pressure-relief and non-return valves
- Electrical controls or a solar power system
Our Subsurface Aeration Range
We supply a wide range of complete subsurface aeration systems, including:


Where diffused aeration works well
Diffused systems are commonly used for:
- Deep dams
- Large ponds
- Long or irregular waterbodies
- Locations where visible equipment is not wanted
- Dams requiring several aeration zones
- Sites where the compressor can remain onshore
One compressor may operate several diffusers, which can make the system suitable for dams with multiple deep areas or isolated sections.
How diffused aeration is installed
Step 1: Select the compressor location
The compressor should be installed:
- Above the normal flood level
- Close enough to limit excessive airline length
- In a dry and accessible position
- Inside a ventilated enclosure
- Away from bedrooms, offices or other noise-sensitive areas
- Where filters and service parts can be reached safely
Do not place a compressor in a sealed box. Compressors produce heat and require airflow.
Step 2: Plan the airline route
Weighted airline is commonly used inside the dam because it sinks without requiring separate weights.
Airline running across land may be:
- Buried in a shallow trench
- Protected inside conduit
- Secured away from vehicles, animals and mowing equipment
The airline diameter must suit the airflow, distance and operating pressure. Long or undersized airlines can reduce performance.
Step 3: Position the diffusers
Diffusers are usually placed in selected deep zones, but the deepest point is not automatically the correct location.
Placement should account for:
- Dam contours
- Water depth
- Sediment depth
- Separate basins
- Intake pipes
- Fishing areas
- Swimming areas
- Existing aquatic habitat
- The circulation pattern required
Diffusers should not be allowed to sink into soft sediment. A raised base or diffuser platform may be required.
Step 4: Lower each diffuser into place
Diffusers may be installed from a small boat or pulled into position using ropes from opposite banks.
Each unit should be lowered gradually and kept level. Dropping a diffuser can damage its membrane or bury it in sediment.
Step 5: Connect and test the compressor
Check:
- Airline connections
- Manifold settings
- Pressure
- Airflow to each diffuser
- Unusual noise or vibration
- Air leaks
- Compressor temperature
Fixed electrical work should be completed and verified by an appropriately licensed electrician.
Step 6: Commission the system gradually
A dam that has been stagnant or stratified should not always be mixed rapidly.
Bottom water may contain very little oxygen and may carry accumulated gases or decomposing organic material. Rapidly moving this water through the whole dam may place fish under stress.
A staged start-up may involve short operating periods that increase over several days. The correct schedule depends on the dam’s condition, depth, season and aquatic life.
Advantages of diffused aeration
- Equipment is mostly hidden below the surface
- One compressor can serve several zones
- Suitable for deep dams
- Good whole-column circulation
- Shore-based equipment is easier to service
- Can be expanded with additional diffuser stations
Limitations
- Requires correct pressure and airflow calculations
- Diffusers can clog or become covered by sediment
- Airline damage can reduce performance
- Poor placement can leave circulation gaps
- Compressor noise needs to be managed
- Staged commissioning may be needed
How to install a subsurface dam aerator – a step by step guide

How to Install a Lake Bed Aerator on Your Dam – A Step-by-Step Guide!

2. Surface Aerators
A surface aerator sits on or close to the water surface. A motor-driven propeller, impeller or rotor agitates the water and exposes it to the air.
The movement transfers oxygen into the upper section of the water and pushes aerated water away from the unit.
Where surface aerators work well
Surface aerators are often suited to:
- Shallow dams
- Wastewater lagoons
- Aquaculture ponds
- Emergency oxygen support
- Dams requiring strong localised mixing
- Sites where rapid surface agitation is useful
How surface aerators are installed
A floating surface aerator is generally installed using:
- A suitable power cable and control system
- Floats or a floating frame
- Mooring ropes or stainless-steel cables
- Shore anchors or weighted anchors
- Correct water depth below the motor or propeller
- Safe access for retrieval and maintenance
The mooring arrangement should hold the aerator in position while allowing for changing water levels.
Electrical cables must be suitable for the installation environment and protected from:
- Livestock
- Vehicles
- Boats
- Sharp rocks
- UV exposure
- Abrasion
- Moving mechanical parts
Advantages of surface aeration
- Strong surface agitation
- Visible confirmation that the system is operating
- Useful for shallow water
- Can provide rapid oxygen transfer near the unit
- Often easier to deploy for temporary or emergency use
Limitations
- Mechanical equipment remains in the water
- May not circulate deep water effectively
- Can create noise and spray
- Requires secure mooring
- Floating equipment may interfere with boating or fishing
- Can expose cables to damage
Surface Aerators: Paddlewheel Aerators
Paddlewheel aerators use rotating paddles to lift and splash water across the surface.
They are widely associated with aquaculture because they provide strong surface mixing and directional water flow.

Where paddlewheel aerators work well
They are commonly used in:
- Fish-production ponds
- Marron ponds
- Prawn ponds
- Shallow aquaculture dams
- High-stock-density systems
- Emergency low-oxygen events
Installation method
Paddlewheel systems are usually:
- Mounted on floats
- Positioned in a selected circulation direction
- Secured with ropes or cables
- Connected to suitable electrical controls
- Installed with enough clearance below the paddles
- Positioned to create a broad circular water movement
Several paddlewheels may be arranged around a pond to produce a consistent current.
Advantages of paddlewheel aeration
- Strong mixing
- Useful in shallow aquaculture ponds
- Rapid surface oxygen transfer
- Creates directional circulation
- Easy to observe during operation
Limitations
- High surface disturbance
- Moving parts require maintenance
- May suspend sediment in shallow areas
- Produces noise and spray
- Not suitable for every residential or landscaped dam
A Deadly Avian Botulism Outbreak Halted by Pases Aqua at Lake Jualbup

3. Aerating Fountains

An aerating fountain pumps water into the air through a nozzle. The water breaks into droplets before returning to the dam, increasing contact between water and air.
Fountains can combine water movement with an attractive visual display.
Splash Fountains

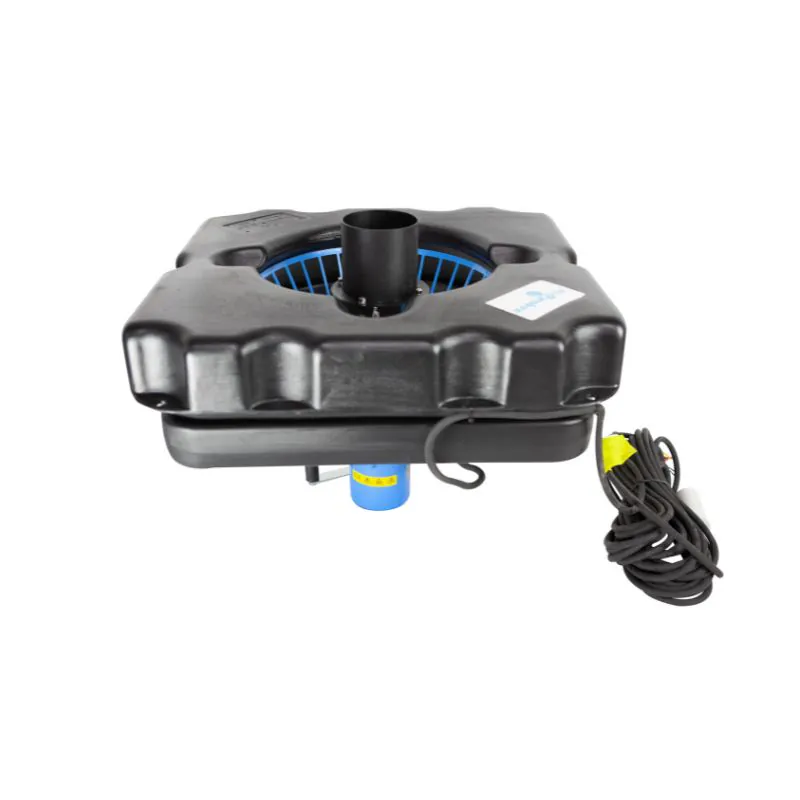 Splash 1.5hp Fountain Kit
Where aerating fountains work well
Fountains are commonly used in:
- Residential dams
- Golf-course lakes
- Public parks
- Resort water bodies
- Commercial properties
- Shallow ornamental lakes
They are most suitable when appearance matters as much as water movement.
How an aerating fountain is installed
Installation generally includes:
- Assembling the float and pump
- Attaching the selected nozzle
- Connecting the power cable
- Positioning the unit in adequate water depth
- Securing two or more mooring lines
- Anchoring the lines to opposite banks or underwater weights
- Testing the spray pattern
- Adjusting the mooring tension
The fountain should have enough clearance from the dam floor to prevent the intake from drawing in sediment.
Advantages of fountains
- Visually appealing
- Easy to see when operating
- Adds surface movement
- Available with different spray patterns
- Can include lighting
Limitations
- Decorative spray does not always provide full-depth circulation
- Wind can move spray outside the dam
- Water loss from evaporation may increase
- Nozzles and pump intakes can block
- Usually less suitable as the only aeration method for deep dams
A fountain may be combined with bottom diffusers when both appearance and deeper circulation are required.
How To: Setup An Otterbine Lake Fountain

How to Install an Otterbine Fractional Series Fountain Aerator – A Step-by-Step Guide

3. Hydraulic Aeration Systems
Venturis
A venturi aerator uses flowing water to draw air into a pipe through a pressure difference. The air and water are mixed before being discharged back into the dam.
The system normally uses:
- A water pump
- Suction pipework
- A venturi injector
- Air intake
- Discharge pipework
- A floating or shore-mounted outlet
Where venturi aeration works well
Venturi systems may suit:
- Irregular shaped water bodies
- Irrigation dams with an existing pump
- Shallow to medium-depth water bodies
- Localised circulation
- Aquaculture systems
- Situations where water movement is required as well as air induction
Installation method
The installer must determine:
- Pump flow rate
- Pump pressure
- Venturi size
- Suction and discharge locations
- Air intake position
- Pipe diameter
- Discharge direction
The air intake must remain above water and clear of dust, insects and debris.
The discharge should be positioned to create circulation rather than returning water directly towards the suction point.
Advantages of venturi aeration
- Can use an existing water-pumping system
- Produces strong directional flow
- Useful for mixing selected areas
- Can be installed from the bank
Limitations
- Performance depends on pump flow and pressure
- Water pumping may consume more energy
- Intakes can block
- Poor placement can create short-circuiting between suction and discharge
- May not circulate the entire dam
Do Venturi Aerators Really Work? | How They Work + Pros & Cons

6. Solar Dam Aeration
Solar power is useful for remote dams where bringing mains electricity to the site would be expensive.
Available examples include:


Solar systems may operate:
- Diffused aeration compressors
- Surface aerators
- Fountains
- Venturi pumps
- Circulation pumps
A basic solar aeration system may include:
- Solar panels
- Panel mounting structure
- Controller
- DC compressor or motor
- Cabling and protection
- Optional batteries
- Airline and diffusers, or a floating aerator
Direct solar operation
A direct solar system operates while sufficient sunlight is available.
This can reduce battery costs, but aeration may stop during cloudy conditions and at night. That limitation is important because dissolved oxygen can fall overnight.
Battery-supported operation
Battery storage allows the aerator to operate outside daylight hours.
The system must be sized for:
- Motor or compressor demand
- Daily operating hours
- Seasonal solar exposure
- Cloudy weather
- Battery depth of discharge
- Required backup time
Advantages of solar aeration
- Suitable for remote dams
- Avoids long mains-power cable runs
- Low operating electricity costs
- Can support both surface and subsurface systems
Limitations
- Higher purchase cost
- Battery replacement may be required
- Solar panels need suitable orientation and exposure
- Performance can change with weather and season
- Panels and cables may need protection from livestock and machinery
- Direct solar systems may not run during periods of greatest oxygen stress
Comparing Dam Aeration Methods
| Aeration type | Best suited to | Main installation method | Main limitation |
| Diffused aeration | Deep, large or irregular dams | Shore compressor connected to bottom diffusers | Requires correct sizing and diffuser placement |
| Surface aeration | Shallow dams and rapid oxygen support | Floating motor secured with mooring lines | Limited deep-water circulation |
| Aerating fountain | Ornamental and public water bodies | Floating pump with nozzle and anchors | Spray display does not guarantee full-depth mixing |
| Venturi aeration | Dams with existing water pumps | Pump and injector connected to discharge pipework | Performance depends on pump pressure and flow |
| Paddlewheel aeration | Shallow aquaculture ponds | Floating paddle-wheel positioned for directional circulation | Noise, spray and moving parts |
| Solar aeration | Remote dams without mains electricity | Solar panels connected to a compressor or floating aerator | Output depends on system size and available sunlight |
How Much Does Dam Aeration Installation Cost in Australia?
Aeration costs vary considerably. Small equipment kits may cost a few thousand dollars, while engineered systems for large dams can cost tens of thousands of dollars.
The following figures are broad planning ranges rather than fixed quotations.
| System type | Indicative equipment and installation range |
| Small pond or dam air-pump system | AUD $800 to $3,000 |
| Small diffused aeration system | AUD $2,500 to $7,500 |
| Multi-diffuser dam aeration system | AUD $6,000 to $20,000 |
| Floating surface aerator | AUD $3,000 to $12,000 |
| Aerating fountain | AUD $3,000 to $15,000 or more |
| Venturi aeration system | AUD $2,000 to $10,000 |
| Paddlewheel aerator | AUD $3,000 to $12,000 per unit |
| Solar aeration system | AUD $5,000 to $25,000 or more |
| Large engineered lake or dam system | AUD $15,000 to $50,000 or more |
Current Australian retail examples show that some individual solar fountain components begin at around AUD $2,000 plus GST, before solar panels, batteries, airline, anchoring, electrical work and installation are added. Larger dam systems are commonly quoted according to site conditions rather than sold at a single fixed price.
What Affects the Installation Cost?
Dam size and depth
Larger dams generally need:
- Higher-capacity equipment
- More diffuser stations
- Longer airline
- Larger motors
- More anchors
- Additional installation labour
Deep diffused systems also require compressors that can operate at the required pressure.
Number of aeration zones
A circular dam may be served by one centrally located system.
A long or divided dam may need several diffusers or aerators to reach isolated areas.
Weighted Airline options:
- PondMAX SubAir Weighted Airline 3/8 Ø x 30m”
- PondMAX SubAir Weighted Airline 3/8 Ø x 150m roll | L3PVCR”
- PondMAX SubAir Weighted Airline ½ Ø x 150m roll | L5PVCR”
- PondMAX SubAir Weighted Airline ½ Ø x 30m”
- PondMAX Subair Weighted Airline 5/8 Ø x 150m Roll”
- Subair weighted airline 3/8 inch PER METER
Power availability
Installing equipment near an existing supply may cost less than:
- Running long underground cables
- Upgrading a switchboard
- Installing a separate circuit
- Building a solar system
- Adding batteries or backup power
Site access
Installation costs may rise when:
- A boat is required
- Banks are steep
- Heavy vegetation blocks access
- Machinery cannot reach the water
- Equipment must be carried over long distances
- The dam contains deep mud or unstable edges
Water-quality testing
Professional testing, bathymetric mapping and system design add upfront costs but can prevent the purchase of equipment that is too small, too large or poorly positioned.
Electrical work
Allow for licensed electrical work where the installation involves:
- Fixed wiring
- New circuits
- Isolators
- Switchboard changes
- Underground cable
- Weatherproof outlets
- Control panels
- Timers
- Solar electrical components
Control and monitoring equipment
Additional costs may include:
- Dissolved oxygen sensors
- Timers
- Remote controls
- Pressure gauges
- Alarm systems
- Variable-speed drives
- Remote monitoring
- Automatic low-oxygen activation
Running and Maintenance Costs
Purchase price is only one part of the total cost.
Electricity
Running cost depends on motor size and operating hours.
A simple estimate is:
Motor rating in kW × operating hours × electricity rate
For example, a 0.75 kW aerator operating for 12 hours each day uses approximately:
0.75 × 12 = 9 kWh per day
The actual energy draw may differ from the rated motor output, so use the manufacturer’s consumption data when available.
Compressor servicing
Diffused aeration compressors may need:
- Air-filter cleaning or replacement
- Diaphragm replacement
- Piston or vane servicing
- Cooling-fan inspection
- Valve inspection
- Pressure checks
Diffuser maintenance
Diffusers may become restricted by:
- Biofilm
- Mineral deposits
- Sediment
- Damaged membranes
- Blocked airline
Uneven bubble patterns or rising operating pressure can indicate a problem.
Floating equipment
Surface aerators and fountains should be checked for:
- Worn bearings
- Damaged propellers or impellers
- Loose mooring lines
- Water entry
- Cable wear
- Blocked pump intakes
- Corrosion
- Excessive vibration
Solar system maintenance
Solar-powered systems may require:
- Panel cleaning
- Cable inspection
- Controller testing
- Battery checks
- Vegetation clearing
- Mounting-frame inspection
Australian Installation and Safety Considerations
Electrical safety
Water and electricity create a high-risk environment.
Fixed electrical installation work should be completed by an appropriately licensed electrician. The installation may require suitable circuit protection, isolation, weather-resistant components and equipment selected for the location.
The applicable requirements will depend on the state or territory, equipment type and power arrangement.
Working near water
Installation teams may need:
- Personal flotation devices
- A stable boat
- Safe bank access
- Weather monitoring
- A rescue plan
- Suitable lifting equipment
- Communication between workers
- Controls for slippery or unstable ground
Do not work alone when installing heavy equipment from a boat or steep bank.
Livestock and machinery
On farms, protect equipment from:
- Cattle
- Horses
- Tractors
- Mowers
- Excavators
- Irrigation equipment
- Bushfire exposure
Compressor cabinets, solar panels, cables and airline should be positioned or guarded accordingly.
Environmental approvals
A privately constructed farm dam may have fewer constraints than a public lake, natural wetland or waterbody connected to a creek.
Before modifying a natural or regulated waterbody, check whether approval is required from:
- The local council
- The relevant state environmental regulator
- A catchment management authority
- A water corporation
- A fisheries or biodiversity authority
- The landowner or facility manager
Extra care may be needed where protected species, native fish, waterways or drinking-water catchments are involved.
Common Dam Aeration Installation Mistakes
Choosing equipment by surface area alone
Depth, volume, shape and oxygen demand also matter.
Installing one aerator in an irregular dam
One unit may leave distant arms or corners untreated.
Using undersized airline
Restricted airflow can reduce diffuser output and increase compressor pressure.
Placing the compressor in a sealed enclosure
Heat can shorten compressor life and cause shutdowns.
Dropping diffusers into soft sediment
A buried diffuser cannot release air properly.
Starting a neglected dam at full capacity
Rapid mixing can move oxygen-poor bottom water throughout the dam.
Assuming visible bubbles mean the whole dam is aerated
Bubbles show that air is being released. They do not prove that all parts of the waterbody are receiving adequate circulation or dissolved oxygen.
Ignoring nutrient inputs
Aeration cannot fully offset ongoing fertiliser runoff, manure, eroding banks or large amounts of decaying vegetation.
Selecting solar equipment without checking night-time demand
A direct solar system may stop when oxygen levels are beginning to fall.
Failing to plan maintenance access
Compressors, motors, diffusers and floating systems all require inspection and servicing.
How to Check Whether the Aeration System Is Working
The system should be assessed after installation rather than judged only by appearance.
Check the following.
Dissolved oxygen
Take measurements:
- Near the surface
- At mid-depth
- Near the bottom
- Close to the aerator
- At distant points
- Early in the morning
- Later in the day
The target dissolved oxygen level should reflect the dam’s use, aquatic life and local water-quality requirements.
Temperature profile
Measure temperature at several depths.
A smaller difference between surface and bottom temperatures may indicate that circulation has reduced stratification.
Airflow and pressure
For diffused systems, monitor:
- Compressor pressure
- Airflow balance
- Bubble distribution
- Changes in compressor sound
- Heat inside the enclosure
Water conditions
Over time, record:
- Odour
- Water clarity
- Algae
- Surface scum
- Fish behaviour
- Sediment disturbance
- Pump or irrigation blockage
- Changes in aquatic vegetation
Improvements may take time, particularly where the dam has accumulated nutrients and organic matter over many years.
Dam Aeration Installation Checklist
Before installation:
- Measure the dam’s surface area
- Estimate average and maximum depth
- Calculate approximate water volume
- Map the shape and deep zones
- Test dissolved oxygen and temperature at several depths
- Identify the main water-quality problem
- Confirm the purpose of the dam
- Check mains and solar power options
- Select the aeration method
- Calculate the required capacity
- Plan equipment and diffuser locations
- Check access and safety conditions
- Confirm electrical requirements
- Check whether environmental approval is needed
During installation:
- Position the compressor above flood level
- Provide enclosure ventilation
- Protect cables and airline
- Secure floating equipment correctly
- Keep diffusers above soft sediment
- Check all connections
- Test airflow and pressure
- Complete electrical testing
- Start the system gradually where required
After installation:
- Record initial dissolved oxygen readings
- Check each aeration zone
- Inspect moorings and anchors
- Monitor compressor temperature
- Confirm the operating schedule
- Repeat water-quality testing
- Create a maintenance calendar
- Keep service and performance records
Which Aeration System Is Best for an Australian Dam?
A diffused aeration system is often suitable for deeper dams where full water-column circulation and discreet equipment are preferred.
A surface aerator may be a better choice for shallow dams, aquaculture ponds or situations requiring rapid surface mixing.
An aerating fountain suits ornamental dams where visual appearance matters, although deep-water circulation may require a separate diffuser system.
Venturi and paddlewheel systems can work well where strong water movement is required or where pumping equipment is already available.
Solar aeration is useful for remote properties, but the system must be designed around seasonal sunlight, operating hours and night-time oxygen demand.
The best selection is based on the dam’s volume, depth profile, water-quality condition and management objective, not simply the lowest purchase price.
Final Considerations
A successful aeration system begins with an accurate assessment of the dam.
Before purchasing equipment, establish:
- How much water must be circulated
- Where oxygen levels are lowest
- Whether the dam is stratified
- How many circulation zones are required
- Which power source is practical
- How the equipment will be serviced
- What improvement will be measured after installation
Correct sizing, placement and commissioning can improve system performance and avoid unnecessary power use. Poorly selected equipment may produce visible bubbles or spray without addressing the deeper water-quality problem.
For large dams, valuable fish stocks, irrigation storage or recurring algae issues, professional water testing and system design should be considered before installation.



![Which Aerator Should I Choose]](https://www.pasesaqua.com.au/wp-content/uploads/2026/07/Which-Aerator-Should-I-Choose.webp)